Introduction to web concepts
The Internet can be thought of as an enormous network of
interconnected computer equipment, through which documents,
data, orders and instructions are distributed in every direction. In a
sense, the Internet is the physical element that allows information
to flow between servers, nodes and computers connected either
through cables or fibre optics.
The Internet began in 1969 as part of the research carried out by a
US government agency called ARPA (Advanced Research Projects
Agency) together with four universities. Each university had a
computer which acted as a node. All the computers were connected
to each other thanks to the use of the same protocol prior to the
present TCP/IP, which was integrated as the only protocol in 1973.
Many computers from different agencies gradually joined the
Internet creation project and the first automated applications for
sending messages, files and programs were created. Until 1988, the
European communications network, mainly supported by CERN
(European Council for Nuclear Research), used the X.25 protocol,
which was widely used by companies for sending data over the
telephone network. That same year, an agreement was reached
between both sides of the Atlantic stating that Europe should be
integrated into the TCP/IP protocol, thus forming an intercontinental
computer network.
It was precisely the following year that a work team at CERN, led
by Tim Berners-Lee created a protocol for information exchange
which operated with the TCP/IP network. This protocol, called HTTP
(Hyper Text Transmission Protocol), is based on establishing a dialog
between two machines, in which one acts as a server and the other as
a client. This means that the client computer requests the download
of a document from the server. If the server agrees, it replies by
sending the requested information. The client computer receives the
information, which is shown by a specific application called a browser.
This is essentially an interpreter and an interface for the data received
by the user.
HTML tags were developed in 1990 for the creation of websites but
they are now obsolete and have evolved into HTML language, which
emerged as web programming standard in 1993. It is derived from the
work of the IETF (Internet Engineering Task Force).
Version 5 of HTML is now being developed and implemented. While
its use is becoming widespread, it coexists with websites created by
earlier versions of the program which should be upgraded for the
Web.
What is HTML
The HTML or Hypertext Markup Language is, as you have seen, a
language based on labels or tags. The tags are placed throughout
the text on the page and are interpreted by the browser so that we
only see the result and not the tag itself.
HTML as a markup language has its own syntax, which is based on
organising the tags that hold the data to be displayed to the user.
First of all, it is best to identify the main tags that can be applied to
a text or a data group IN ORDER to create an HTML document. Its
basic syntax is formed by elements consisting of a starting tag, the
content and the closing tag; the latter is not always mandatory. A tag
is text contained between the symbols ‘<’ and ‘>’. The elements can
be characterised by features consisting of a name that identifies the
tag characteristics and a value.

These elements are written according to a hierarchical structure or
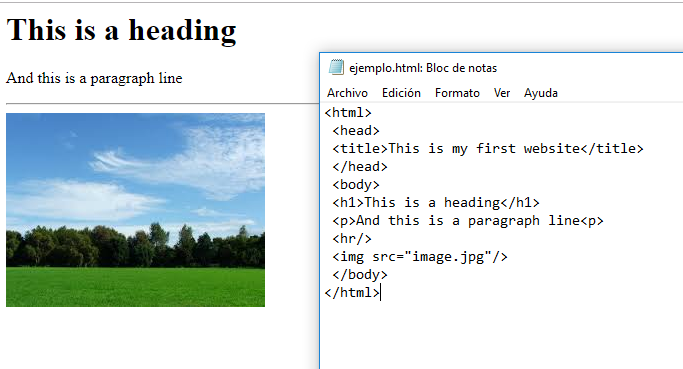
are nested within each other. In the following example you can see
the structure of a basic unformatted HTML document:
<html>
<head>
<title>This is my first website </title>
</head>
<body>
<h1>This is a heading</h1>
<p> And this is a paragraph line<p>
</body>
</html>
Producing HTML documents
On the other hand, the body section contains all the tags that enclose data to be displayed in a browser. In short, the four basic tags, <html>, <head>, <title>, and <body>, are used as follows:

Basic rules
- In order to programme well, you must know some basic rules on tags: The name of the tags is enclosed within the signs ‘<’ and ‘>’ (without the quotation marks). The text of the tags may be written in uppercase or lowercase, although lowercase is recommended to make it more readable. For example, the tags at the beginning of a paragraph and will be treated the same way by the browser.
- Most tags must be put in pairs: <p> and </p>
<p> indicates the opening of a block, in this case, a paragraph.
</p> indicates the closing of the block.
- The written text enclosed between <p> and </p> is considered the content of the paragraph block and will be displayed in the size and font set by default in the browser.
- Certain tags are stand-alone, in other words, there is no opening or closing tag, since they already contain data, as in the case of the instruction to incorporate an image, or they simply indicate the insertion of a line break or the position of a horizontal line. There are a few stand-alone tags that do not have a close tag indicator.
Look at the following example, where an image previously stored
in the ‘images’ folder in the same location as the HTML file will be
incorporated.
In order to continue including objects, we have to know the different
tags which in turn incorporate diverse segments. For example, atag which defines a text paragraph may contain diverse text control
attributes such as alignment, font colour, font type and size, and so on.
In this case we could use the tag in which all these attributes
will be placed instead of the text tags found inside.
Example:
<font color="#FF0033" size="2">
<p> And this line for writing with a smaller font size</p>
</font>
In the same way, an image tag ![]() , in addition to containing the src
segment which indicates the location of the image, can also include
other features such as the width and the height
of the image, its position on the page (Align), the
adaptation of the text surrounding the image, and
so on. Notice how the following attributes are
added to the text of the previous example.
, in addition to containing the src
segment which indicates the location of the image, can also include
other features such as the width and the height
of the image, its position on the page (Align), the
adaptation of the text surrounding the image, and
so on. Notice how the following attributes are
added to the text of the previous example.
<img src="image.jpg" align="right" width="240" height="150">
By substituting these code lines in the first example,
you can see how the appearance of the website
reproduced in the browser changes, and that after
having set the width and height of the photograph,
it has become smaller and is now aligned to the
right of the window.

Programming with an HTML editor
Building our first website does not need to be complicated. All you
need is a simple text editor. The large number of existing HTML
tags, however, increases the possibility of making mistakes when
typing them. Using an HTML editor is therefore recommended.
There are numerous editors, both free and commercial versions,
for all operating systems and some of them, called WYSIWYG
(What You See Is What You Get) even allow you to see what the
website will look like as you are programming. Word processors
like LibreOffice Writer are also capable of handling HTML.
Nonetheless, it is a good idea to try different text editors and even
download a trial copy of an editor with an operating license. One of
the most widespread editors is Macromedia Dreamweaver, although
free license or open source text editors such as Kompozer or Blue
Griffon have all the necessary utilities for designing, programming
and disseminating websites.
Some HTML tags
Colours
Font and background colours can be changed. The default values are
white for the background and black for fonts. HTML uses hexadecimal
coding, which is based on the primary colours of the additive mixture
(red, green and blue known as RGB). The proportion of each of these
colours is determined by two hexadecimal digits. The colour codes
are preceded by the symbol ‘#’ when they are used.

Fonts
If we want the information on our website to be read easily, we cannot
neglect the fonts we use.
There are a wide variety of fonts, although they can be encompassed
in four big families: Serif, Sans Serif, Script and Display. In addition,
there are variants of each font. The most well-known are those
that change the thickness of the font (bold, ultra-thin, etc.) and the
inclination (italics and inclined).
Another aspect that should be taken into consideration is the font size.
The following table shows you the features which can accompany the <Font> tag:

All the attributes can be combined into one single tag. For example:
<font color="blue" face="Arial" size="4">
You can use other modifiers to highlight the text:

Headers
Headers exist in order to create titles on a page. They have a
predetermined font size and highlighting. They also enable the
alignment of the header text to be changed.
It should be noted that different browsers interpret headers differently.

Lists
A list is very useful when you want to provide information schematically.
Lists therefore use the following tags:

Example:
- <h1>These are two examples of lists.</h1>
<p>This is a disordered list.</p>
<ol>
<li>Scissors</li>
<li>Card</li>
<li>Plastic film </li>
</ol>
<p> And this is an ordered list</p>
<ul>
<li>January</li>
<li>February</li>
<li>March</li>
</ul>

Tables
Tables are a very useful resource when it comes to displaying
information or data in an orderly manner. They sometimes define
content divisions and the position of objects on a website. In order
to create a table you should take the following possibilities into
consideration.
Tags for tables:

Attributes of a table:
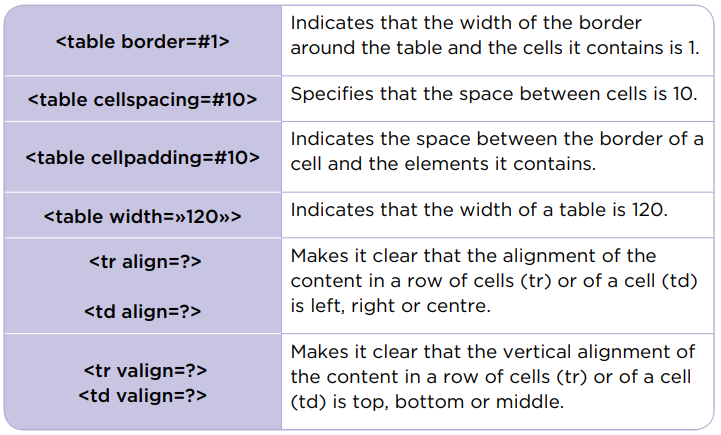
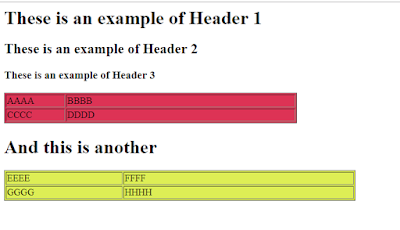
<table width="500" bgcolor="#DD3355" border="1">
<tr>
<td width="100">AAAA</td>
<td width="400">BBBB</td>
</tr>
<tr>
<td>CCCC</td>
<td>DDDD</td>
</tr>
</table>
<h1> And this is another</h1>
<table width="600" bgcolor="#DDEE55" border="0">
<tr>
<td width="200">EEEE</td>
<td width="400">FFFF</td>
</tr>
<tr>
<td>GGGG</td>
<td>HHHH</td>
</tr>
</table>
If you want to learn more about HTML tags, please, click here.
Activity: Our First Web Page
- Copy the code from the example ‘My first website’ in Notepad text editor. Save it with the name Myweb1.html. It is very important to have the .html extension and not .html.txt. Certain text editors such as Windows Notepad will automatically add the .txt extension to files which are created with them. Make sure this does not happen.
- Once you have created your html file, open it with different browsers and note whether there is any difference in the title bar and the way it appears on screen.
- Add two more text lines to your website. Save the file as Myweb2.html and then open it with a browser. Did you get the expected result? If not, find out where you went wrong and correct it.
- The tag <br> creates a line break within the same paragraph. Look for the syntax of the attributes which can be added to the <p> tag and create a new website with four paragraphs each containing at least four lines. Each paragraph should be aligned (using align attribute) in a different way: to the left, in the centre, to the right and justified. Save the file and Myweb3.html and open it with a browser.
- Edit file Myweb3.html and add tags to change the colour of the background and written text. Use a light colour for the background and another colour which provides a good contrast for the written paragraphs. You will have to use the following tags: <body bgcolor=#rrggbb> and <font color=#rrggbbb> where rrggbb indicates the hexadecimal coding of the RGB colours. Save the file as Myweb4.html.
- Edit the file Myweb4.html and add the <font> label of the example to change the colour, appearance and size of the written text. Save the file as Myweb5.html.
- Edit the file Myweb5.html and highlight different words by using the modifiers. You can combine two or more of them. Make sure the words you highlight are ones which we must draw the reader’s attention. Save the file as Myweb6.html.
- Create a new file Myweb7.html in which you will use headers to separate the different sections. You should use these tags at least once: <H1>, <H2> and <H3>. Remember to introduce header closing tags. Example:
- Add an image to your Website.
- Include two list, disordered one and ordered one, in the file Myweb7.html and save it as Myweb8.html.
- Include two tables in the file Myweb7.html and save it as Myweb8.html. See what it looks like in the browser and try to change its shape, cell contents and the number of cells, as well as their colour.
- Create a web page on the topic that you want. The page must contain each and every one of the tags seen in class and we have practiced in the previous points (Images, tables, lists, paragraphs, headers......), .
<html>
<head>
<title>This is my first website </title>
</head>
<body>
<h1>This is a heading</h1>
<p> And this is a paragraph line<p>
</body>
</html>

Important: You have three session to finish the activity.
When you finish both exercises, you will upload all files to Edmodo activity.
Evaluación: Each MyWeb file has the following value:
Myweb1 - 0,5 point
Myweb2 - 0,5 point
Myweb3 - 0,5 point
Myweb4 - 0,5 point
Myweb5 - 1 point
Myweb6 - 1 point
Myweb7 - 1 point
Myweb8 - 1 points
When you finish both exercises, you will upload all files to Edmodo activity.
Evaluación: Each MyWeb file has the following value:
Myweb1 - 0,5 point
Myweb2 - 0,5 point
Myweb3 - 0,5 point
Myweb4 - 0,5 point
Myweb5 - 1 point
Myweb6 - 1 point
Myweb7 - 1 point
Myweb8 - 1 points
Your Web - 4 points